This blog post is co-written with Caroline Chung from Veoneer.
Veoneer is a global automotive electronics company and a world leader in automotive electronic safety systems. They offer best-in-class restraint control systems and have delivered over 1 billion electronic control units and crash sensors to car manufacturers globally. The company continues to build on a 70-year history of automotive safety development, specializing in cutting-edge hardware and systems that prevent traffic incidents and mitigate accidents.
Automotive in-cabin sensing (ICS) is an emerging space that uses a combination of several types of sensors such as cameras and radar, and artificial intelligence (AI) and machine learning (ML) based algorithms for enhancing safety and improving riding experience. Building such a system can be a complex task. Developers have to manually annotate large volumes of images for training and testing purposes. This is very time consuming and resource intensive. The turnaround time for such a task is several weeks. Furthermore, companies have to deal with issues such as inconsistent labels due to human errors.
AWS is focused on helping you increase your development speed and lower your costs for building such systems through advanced analytics like ML. Our vision is to use ML for automated annotation, enabling retraining of safety models, and ensuring consistent and reliable performance metrics. In this post, we share how, by collaborating with Amazon’s Worldwide Specialist Organization and the Generative AI Innovation Center, we developed an active learning pipeline for in-cabin image head bounding boxes and key points annotation. The solution reduces cost by over 90{7df079fc2838faf5776787b4855cb970fdd91ea41b0d21e47918e41b3570aafe}, accelerates the annotation process from weeks to hours in terms of the turnaround time, and enables reusability for similar ML data labeling tasks.
Solution overview
Active learning is an ML approach that involves an iterative process of selecting and annotating the most informative data to train a model. Given a small set of labeled data and a large set of unlabeled data, active learning improves model performance, reduces labeling effort, and integrates human expertise for robust results. In this post, we build an active learning pipeline for image annotations with AWS services.
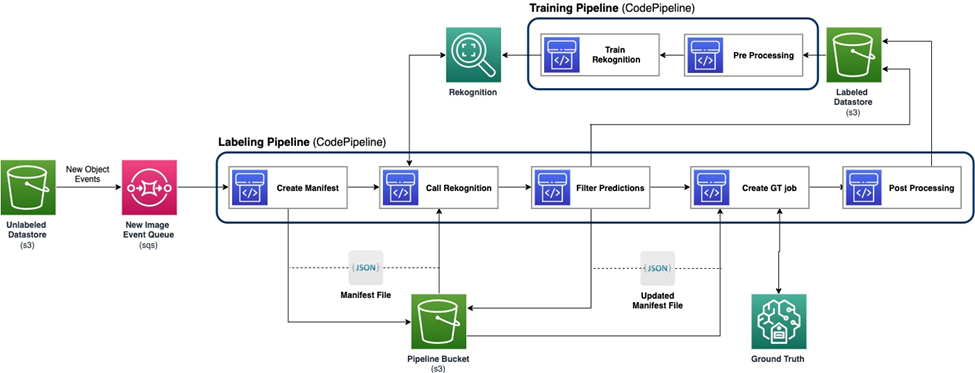
The following diagram demonstrates the overall framework for our active learning pipeline. The labeling pipeline takes images from an Amazon Simple Storage Service (Amazon S3) bucket and outputs annotated images with the cooperation of ML models and human expertise. The training pipeline preprocesses data and uses them to train ML models. The initial model is set up and trained on a small set of manually labeled data, and will be used in the labeling pipeline. The labeling pipeline and training pipeline can be iterated gradually with more labeled data to enhance the model’s performance.
In the labeling pipeline, an Amazon S3 Event Notification is invoked when a new batch of images comes into the Unlabeled Datastore S3 bucket, activating the labeling pipeline. The model produces the inference results on the new images. A customized judgement function selects parts of the data based on the inference confidence score or other user-defined functions. This data, with its inference results, is sent for a human labeling job on Amazon SageMaker Ground Truth created by the pipeline. The human labeling process helps annotate the data, and the modified results are combined with the remaining auto annotated data, which can be used later by the training pipeline.
Model retraining happens in the training pipeline, where we use the dataset containing the human-labeled data to retrain the model. A manifest file is produced to describe where the files are stored, and the same initial model is retrained on the new data. After retraining, the new model replaces the initial model, and the next iteration of the active learning pipeline starts.
Model deployment
Both the labeling pipeline and training pipeline are deployed on AWS CodePipeline. AWS CodeBuild instances are used for implementation, which is flexible and fast for a small amount of data. When speed is needed, we use Amazon SageMaker endpoints based on the GPU instance to allocate more resources to support and accelerate the process.
The model retraining pipeline can be invoked when there is new dataset or when the model’s performance needs improvement. One critical task in the retraining pipeline is to have the version control system for both the training data and the model. Although AWS services such as Amazon Rekognition have the integrated version control feature, which makes the pipeline straightforward to implement, customized models require metadata logging or additional version control tools.
The entire workflow is implemented using the AWS Cloud Development Kit (AWS CDK) to create necessary AWS components, including the following:
- Two roles for CodePipeline and SageMaker jobs
- Two CodePipeline jobs, which orchestrate the workflow
- Two S3 buckets for the code artifacts of the pipelines
- One S3 bucket for labeling the job manifest, datasets, and models
- Preprocessing and postprocessing AWS Lambda functions for the SageMaker Ground Truth labeling jobs
The AWS CDK stacks are highly modularized and reusable across different tasks. The training, inference code, and SageMaker Ground Truth template can be replaced for any similar active learning scenarios.
Model training
Model training includes two tasks: head bounding box annotation and human key points annotation. We introduce them both in this section.
Head bounding box annotation
Head bounding box annotation is a task to predict the location of a bounding box of the human head in an image. We use an Amazon Rekognition Custom Labels model for head bounding box annotations. The following sample notebook provides a step-by-step tutorial on how to train a Rekognition Custom Labels model via SageMaker.
We first need to prepare the data to start the training. We generate a manifest file for the training and a manifest file for the test dataset. A manifest file contains multiple items, each of which is for an image. The following is an example of the manifest file, which includes the image path, size, and annotation information:
Using the manifest files, we can load datasets to a Rekognition Custom Labels model for training and testing. We iterated the model with different amounts of training data and tested it on the same 239 unseen images. In this test, the mAP_50 score increased from 0.33 with 114 training images to 0.95 with 957 training images. The following screenshot shows the performance metrics of the final Rekognition Custom Labels model, which yields great performance in terms of F1 score, precision, and recall.

We further tested the model on a withheld dataset that has 1,128 images. The model consistently predicts accurate bounding box predictions on the unseen data, yielding a high mAP_50 of 94.9{7df079fc2838faf5776787b4855cb970fdd91ea41b0d21e47918e41b3570aafe}. The following example shows an auto-annotated image with a head bounding box.

Key points annotation
Key points annotation produces locations of key points, including eyes, ears, nose, mouth, neck, shoulders, elbows, wrists, hips, and ankles. In addition to the location prediction, visibility of each point is needed to predict in this specific task, for which we design a novel method.
For key points annotation, we use a Yolo 8 Pose model on SageMaker as the initial model. We first prepare the data for training, including generating label files and a configuration .yaml file following Yolo’s requirements. After preparing the data, we train the model and save artifacts, including the model weights file. With the trained model weights file, we can annotate the new images.
In the training stage, all the labeled points with locations, including visible points and occluded points, are used for training. Therefore, this model by default provides the location and confidence of the prediction. In the following figure, a large confidence threshold (main threshold) near 0.6 is capable of dividing the points that are visible or occluded versus outside of camera’s viewpoints. However, occluded points and visible points are not separated by the confidence, which means the predicted confidence is not useful for predicting the visibility.

To get the prediction of visibility, we introduce an additional model trained on the dataset containing only visible points, excluding both occluded points and outside of camera’s viewpoints. The following figure shows the distribution of points with different visibility. Visible points and other points can be separated in the additional model. We can use a threshold (additional threshold) near 0.6 to get the visible points. By combining these two models, we design a method to predict the location and visibility.

A key point is first predicted by the main model with location and main confidence, then we get the additional confidence prediction from the additional model. Its visibility is then classified as follows:
- Visible, if its main confidence is greater than its main threshold, and its additional confidence is greater than the additional threshold
- Occluded, if its main confidence is greater than its main threshold, and its additional confidence is less than or equal to the additional threshold
- Outside of camera’s review, if otherwise
An example of key points annotation is demonstrated in the following image, where solid marks are visible points and hollow marks are occluded points. Outside of the camera’s review points are not shown.

Based on the standard OKS definition on the MS-COCO dataset, our method is able to achieve mAP_50 of 98.4{7df079fc2838faf5776787b4855cb970fdd91ea41b0d21e47918e41b3570aafe} on the unseen test dataset. In terms of visibility, the method yields a 79.2{7df079fc2838faf5776787b4855cb970fdd91ea41b0d21e47918e41b3570aafe} classification accuracy on the same dataset.
Human labeling and retraining
Although the models achieve great performance on test data, there are still possibilities for making mistakes on new real-world data. Human labeling is the process to correct these mistakes for enhancing model performance using retraining. We designed a judgement function that combined the confidence value that output from the ML models for the output of all head bounding box or key points. We use the final score to identify these mistakes and the resultant bad labeled images, which need to be sent to the human labeling process.
In addition to bad labeled images, a small portion of images are randomly chosen for human labeling. These human-labeled images are added into the current version of the training set for retraining, enhancing model performance and overall annotation accuracy.
In the implementation, we use SageMaker Ground Truth for the human labeling process. SageMaker Ground Truth provides a user-friendly and intuitive UI for data labeling. The following screenshot demonstrates a SageMaker Ground Truth labeling job for head bounding box annotation.

The following screenshot demonstrates a SageMaker Ground Truth labeling job for key points annotation.

Cost, speed, and reusability
Cost and speed are the key advantages of using our solution compared to human labeling, as shown in the following tables. We use these tables to represent the cost savings and speed accelerations. Using the accelerated GPU SageMaker instance ml.g4dn.xlarge, the whole life training and inference cost on 100,000 images is 99{7df079fc2838faf5776787b4855cb970fdd91ea41b0d21e47918e41b3570aafe} less than the cost of human labeling, while the speed is 10–10,000 times faster than the human labeling, depending on the task.
The first table summarizes the cost performance metrics.
| Model | mAP_50 based on 1,128 test images | Training cost based on 100,000 images | Inference cost based on 100,000 images | Cost reduction compared to human annotation | Inference time based on 100,000 images | Time acceleration compared to human annotation |
| Rekognition head bounding box | 0.949 | $4 | $22 | 99{7df079fc2838faf5776787b4855cb970fdd91ea41b0d21e47918e41b3570aafe} less | 5.5 h | Days |
| Yolo Key points | 0.984 | $27.20 | * $10 | 99.9{7df079fc2838faf5776787b4855cb970fdd91ea41b0d21e47918e41b3570aafe} less | minutes | Weeks |
The following table summarizes performance metrics.
| Annotation Task | mAP_50 ({7df079fc2838faf5776787b4855cb970fdd91ea41b0d21e47918e41b3570aafe}) | Training Cost ($) | Inference Cost ($) | Inference Time |
| Head Bounding Box | 94.9 | 4 | 22 | 5.5 hours |
| Key Points | 98.4 | 27 | 10 | 5 minutes |
Moreover, our solution provides reusability for similar tasks. Camera perception developments for other systems like advanced driver assist system (ADAS) and in-cabin systems can also adopt our solution.
Summary
In this post, we showed how to build an active learning pipeline for automatic annotation of in-cabin images utilizing AWS services. We demonstrate the power of ML, which enables you to automate and expedite the annotation process, and the flexibility of the framework that uses models either supported by AWS services or customized on SageMaker. With Amazon S3, SageMaker, Lambda, and SageMaker Ground Truth, you can streamline data storage, annotation, training, and deployment, and achieve reusability while reducing costs significantly. By implementing this solution, automotive companies can become more agile and cost-efficient by using ML-based advanced analytics such as automated image annotation.
Get started today and unlock the power of AWS services and machine learning for your automotive in-cabin sensing use cases!
About the Authors
 Yanxiang Yu is an Applied Scientist at at the Amazon Generative AI Innovation Center. With over 9 years of experience building AI and machine learning solutions for industrial applications, he specializes in generative AI, computer vision, and time series modeling.
 Tianyi Mao is an Applied Scientist at AWS based out of Chicago area. He has 5+ years of experience in building machine learning and deep learning solutions and focuses on computer vision and reinforcement learning with human feedbacks. He enjoys working with customers to understand their challenges and solve them by creating innovative solutions using AWS services.
 Yanru Xiao is an Applied Scientist at the Amazon Generative AI Innovation Center, where he builds AI/ML solutions for customers’ real-world business problems. He has worked in several fields, including manufacturing, energy, and agriculture. Yanru obtained his Ph.D. in Computer Science from Old Dominion University.
 Paul George is an accomplished product leader with over 15 years of experience in automotive technologies. He is adept at leading product management, strategy, Go-to-Market and systems engineering teams. He has incubated and launched several new sensing and perception products globally. At AWS, he is leading strategy and go-to-market for autonomous vehicle workloads.
 Caroline Chung is an engineering manager at Veoneer (acquired by Magna International), she has over 14 years of experience developing sensing and perception systems. She currently leads interior sensing pre-development programs at Magna International managing a team of compute vision engineers and data scientists.

