Enterprises in industries like manufacturing, finance, and healthcare are inundated with a constant flow of documents—from financial reports and contracts to patient records and supply chain documents. Historically, processing and extracting insights from these unstructured data sources has been a manual, time-consuming, and error-prone task. However, the rise of intelligent document processing (IDP), which uses the power of artificial intelligence and machine learning (AI/ML) to automate the extraction, classification, and analysis of data from various document types is transforming the game. For manufacturers, this means streamlining processes like purchase order management, invoice processing, and supply chain documentation. Financial services firms can accelerate workflows around loan applications, account openings, and regulatory reporting. And in healthcare, IDP revolutionizes patient onboarding, claims processing, and medical record keeping.
By integrating IDP into their operations, organizations across these key industries experience transformative benefits: increased efficiency and productivity through the reduction of manual data entry, improved accuracy and compliance by reducing human errors, enhanced customer experiences due to faster document processing, greater scalability to handle growing volumes of documents, and lower operational costs associated with document management.
This post demonstrates how to build an IDP pipeline for automatically extracting and processing data from documents using Amazon Bedrock Prompt Flows, a fully managed service that enables you to build generative AI workflow using Amazon Bedrock and other services in an intuitive visual builder. Amazon Bedrock Prompt Flows allows you to quickly update your pipelines as your business changes, scaling your document processing workflows to help meet evolving demands.
Solution overview
To be scalable and cost-effective, this solution uses serverless technologies and managed services. In addition to Amazon Bedrock Prompt Flows, the solution uses the following services:
- Amazon Textract – Automatically extracts printed text, handwriting, and data from
- Amazon Simple Storage Service (Amazon S3) – Object storage built to retrieve data from anywhere.
- Amazon Simple Notification Service (Amazon SNS) – A highly available, durable, secure, and fully managed publish-subscribe (pub/sub) messaging service to decouple microservices, distributed systems, and serverless applications.
- AWS Lambda – A compute service that runs code in response to triggers such as changes in data, changes in application state, or user actions. Because services such as Amazon S3 and Amazon SNS can directly trigger an AWS Lambda function, you can build a variety of real-time serverless data-processing systems.
- Amazon DynamoDB – a serverless, NoSQL, fully-managed database with single-digit millisecond performance at
Solution architecture
The solution proposed contains the following steps:
- Users upload a PDF for analysis to Amazon S3.
- The Amazon S3 upload triggers an AWS Lambda function execution.
- The function invokes Amazon Textract to extract text from the PDF in batch mode.
- Amazon Textract sends an SNS notification when the job is complete.
- An AWS Lambda function reads the Amazon Textract response and calls an Amazon Bedrock prompt flow to classify the document.
- Results of the classification are stored in Amazon S3 and sent to a destination AWS Lambda function.
- The destination AWS Lambda function calls an Amazon Bedrock prompt flow to extract and analyze data based on the document class provided.
- Results of the extraction and analysis are stored in Amazon S3.
This workflow is shown in the following diagram.
In the following sections, we dive deep into how to build your IDP pipeline with Amazon Bedrock Prompt Flows.
Prerequisites
To complete the activities described in this post, ensure that you complete the following prerequisites in your local environment:
Implementation time and cost estimation
| Time to complete | ~ 60 minutes |
| Cost to run 1000 pages | Under $25 |
| Time to cleanup | ~20 minutes |
| Learning level | Advanced (300) |
Deploy the solution
To deploy the solution, follow these steps:
- Clone the GitHub repository
- Use the shell script to build and deploy the solution by running the following commands from your project root directory:
- This will trigger the AWS CloudFormation template in your AWS account.
Test the solution
Once the template is deployed successfully, follow these steps to test the solution:
- On the AWS CloudFormation console, select the stack that was deployed
- Select the Resources tab
- Locate the resources labeled SourceS3Bucket and DestinationS3Bucket, as shown in the following screenshot. Select the link to open the SourceS3Bucket in a new tab

- Select Upload and then Add folder
- Under sample_files, select the folder customer123, then choose Upload
Alternatively, you can upload the folder using the following AWS CLI command from the root of the project:
After a few minutes the uploaded files will be processed. To view the results, follow these steps:
- Open the DestinationS3Bucket
- Under customer123, you should see a folder for documents for the processing jobs. Download and review the files locally using the console or with the following AWS CLI command
Inside the folder for customer123 you will see several subfolders, as shown in the following diagram:
How it works
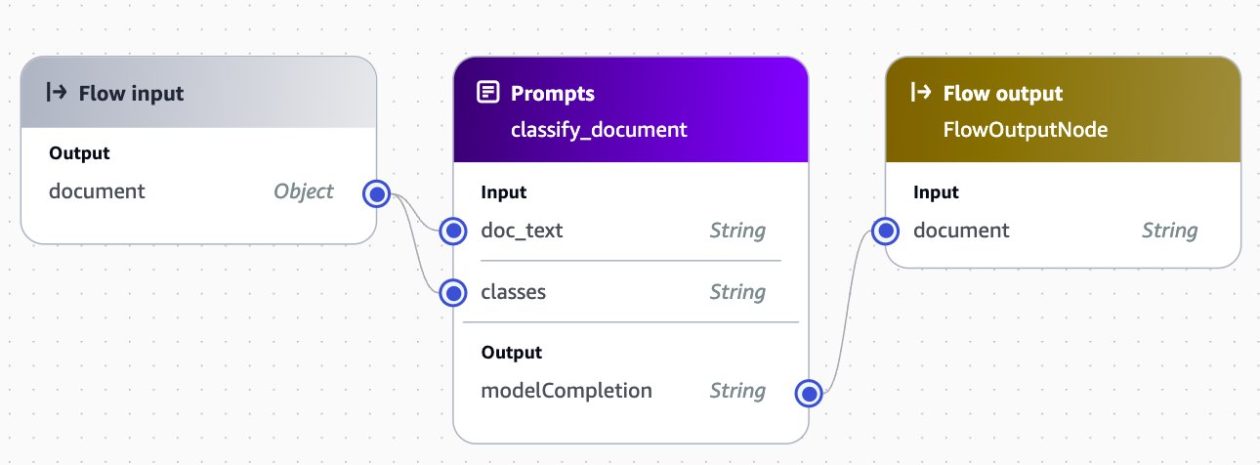
After the document text is extracted, it is sent to a classify prompt flow along with a list of classes, as shown in the following screenshot:

The list of classes is generated in the AWS Lambda function by using the API to identify existing prompt flows that contain class definitions in their description. This approach allows us to expand the solution to new document types by adding a new prompt flow supporting the new document class, as shown in the following screenshot:

For each document type, you can implement an extract and analyze flow that is appropriate to this document type. The following screenshot shows an example flow from the URLA_1003 flow. In this case, a prompt is used to convert the text to a standardized JSON format, and a second prompt then analyzes that JSON document to generate a report to the processing agent.

Expand the solution using Amazon Bedrock Prompt Flows
To adapt to new use cases without changing the underlying code, use Amazon Bedrock Prompt Flows as described in the following steps.
Create a new prompt
From the files you downloaded, look for a folder named FOR_REVIEW. This folder contains documents that were processed and did not fit into an existing class. Open report.txt and review the suggested document class and proposed JSON template.
- In the navigation pane in Amazon Bedrock, open Prompt management and select Create prompt, as shown in the following screenshot:

- Name the new prompt
IDP_PAYSTUB_JSONand then choose Create - In the Prompt box, enter the following text. Replace
COPY YOUR JSON HEREwith the JSON template from your txt file
The following screenshot demonstrates this step.

- Choose Select model and choose Anthropic Claude 3 Sonnet
- Save your changes by choosing Save draft
- To test your prompt, open the pages_[n].txt file FOR_REVIEW folder and copy the content into the doc_text input box. Choose Run and the model should return a response
The following screenshot demonstrates this step.

- When you are satisfied with the results, choose Create Version. Note the version number because you will need it in the next section
Create a prompt flow
Now we will create a prompt flow using the prompt you created in the previous section.
- In the navigation menu, choose Prompt flows and then choose Create prompt flow, as shown in the following screenshot:

- Name the new flow
IDP_PAYSTUB - Choose Create and use a new service role and then choose Save
Next, create the flow using the following steps. When you are done, the flow should resemble the following screenshot.

- Configure the Flow input node:
- Choose the Flow input node and select the Configure
- Select Object as the Type. This means that flow invocation will expect to receive a JSON object.
- Add the S3 Retrieval node:
- In the Prompt flow builder navigation pane, select the Nodes tab
- Drag an S3 Retrieval node into your flow in the center pane
- In the Prompt flow builder pane, select the Configure tab
- Enter
get_doc_textas the Node name - Expand the Inputs Set the input express for objectKey to
$.data.doc_text_s3key - Drag a connection from the output of the Flow input node to the objectKey input of this node
- Add the Prompt node:
- Drag a Prompt node into your flow in the center pane
- In the Prompt flow builder pane, select the Configure tab
- Enter
map_to_jsonas the Node name - Choose Use a prompt from your Prompt Management
- Select
IDP_PAYSTUB_JSONfrom the dropdown - Choose the version you noted previously
- Drag a connection from the output of the get_doc_text node to the doc_text input of this node
- Add the S3 Storage node:
- In the Prompt flow builder navigation pane, select the Nodes tab
- Drag an S3 Storage node into your flow in the center pane
- In the Prompt flow builder pane, select the Configure tab in
- Enter
save_jsonas the Node name - Expand the Inputs Set the input express for objectKey to
$.data.JSON_s3key - Drag a connection from the output of the Flow input node to the objectKey input of this node
- Drag a connection from the output of the map_to_json node to the content input of this node
- Configure the Flow output node:
- Drag a connection from the output of the save_json node to the input of this node
- Choose Save to save your flow. Your flow should now be prepared for testing
- To test your flow, in the Test prompt flow pane on the right, enter the following JSON object. Choose Run and the flow should return a model response
- When you are satisfied with the result, choose Save and exit
To get the path to your file, follow these steps:
- Navigate to FOR_REVIEW in S3 and choose the pages_[n].txt file
- Choose the Properties tab
- Copy the key path by selecting the copy icon to the left of the key value, as shown in the following screenshot. Be sure to replace .txt with .json in the second line of input as noted previously.

Publish a version and alias
- On the flow management screen, choose Publish version. A success banner appears at the top
- At the top of the screen, choose Create alias
- Enter
latestfor the Alias name - Choose Use an existing version to associate this alias. From the dropdown menu, choose the version that you just published
- Select Create alias. A success banner appears at the top.
- Get the
FlowIdandAliasIdto use in the step below- Choose the Alias you just created
- From the ARN, copy the FlowId and AliasId

Add your new class to DynamoDB
- Open the AWS Management Console and navigate to the DynamoDB service.
- Select the table document-processing-bedrock-prompt-flows-IDP_CLASS_LIST
- Choose Actions then Create item
- Choose JSON view for entering the item data.
- Paste the following JSON into the editor:
- Review the JSON to ensure all details are correct.
- Choose Create item to add the new class to your DynamoDB table.
Test by repeating the upload of the test file
Use the console to repeat the upload of the paystub.jpg file from your customer123 folder into Amazon S3. Alternatively, you can enter the following command into the command line:
In a few minutes, check the report in the output location to see that you successfully added support for the new document type.
Clean up
Use these steps to delete the resources you created to avoid incurring charges on your AWS account:
- Empty the SourceS3Bucket and DestinationS3Bucket buckets including all versions
- Use the following shell script to delete the CloudFormation stack and test resources from your account:
- Return to the Expand the solution using Amazon Bedrock Prompt Flows section and follow these steps:
- In the Create a prompt flow section:
- Choose the flow
idp_paystubthat you created and choose Delete - Follow the instructions to permanently delete the flow
- Choose the flow
- In the Create a new prompt section:
- Choose the prompt
paystub_jsonthat you created and choose Delete - Follow the instructions to permanently delete the prompt
- Choose the prompt
- In the Create a prompt flow section:
Conclusion
This solution demonstrates how customers can use Amazon Bedrock Prompt Flows to deploy and expand a scalable, low-code IDP pipeline. By taking advantage of the flexibility of Amazon Bedrock Prompt Flows, organizations can rapidly implement and adapt their document processing workflows to help meet evolving business needs. The low-code nature of Amazon Bedrock Prompt Flows makes it possible for business users and developers alike to create, modify, and extend IDP pipelines without extensive programming knowledge. This significantly reduces the time and resources required to deploy new document processing capabilities or adjust existing ones.
By adopting this integrated IDP solution, businesses across industries can accelerate their digital transformation initiatives, improve operational efficiency, and enhance their ability to extract valuable insights from document-based processes, driving significant competitive advantages.
Review your current manual document processing processes and identify where Amazon Bedrock Prompt Flows can help you automate these workflows for your business.
For further exploration and learning, we recommend checking out the following resources:
About the Authors
 Erik Cordsen is a Solutions Architect at AWS serving customers in Georgia. He is passionate about applying cloud technologies and ML to solve real life problems. When he is not designing cloud solutions, Erik enjoys travel, cooking, and cycling.
 Vivek Mittal is a Solution Architect at Amazon Web Services. He is passionate about serverless and machine learning technologies. Vivek takes great joy in assisting customers with building innovative solutions on the AWS cloud.
 Brijesh Pati is an Enterprise Solutions Architect at AWS. His primary focus is helping enterprise customers adopt cloud technologies for their workloads. He has a background in application development and enterprise architecture and has worked with customers from various industries such as sports, finance, energy, and professional services. His interests include serverless architectures and AI/ML.


